in this article, we will be building a To-Do application with Vue using yarn,
Let’s Start Codding !!.
#System Setup
We need the vue CLI to get start. Simply Put, the Vue CLI is your fastest way to get your app and running. So let’s setup Vue CLI
#install vue CLI
$ npm install — globle vue-cli
Creating a Vue Application
#create project
$ vue create basic-todo-app
$ cd basic-todo-app
$ yarn install
#to serve application
$yarn run dev
this will automatically provide URL:- https://localhost:8080. open you browser and enter URL.
now your file directory look something like this
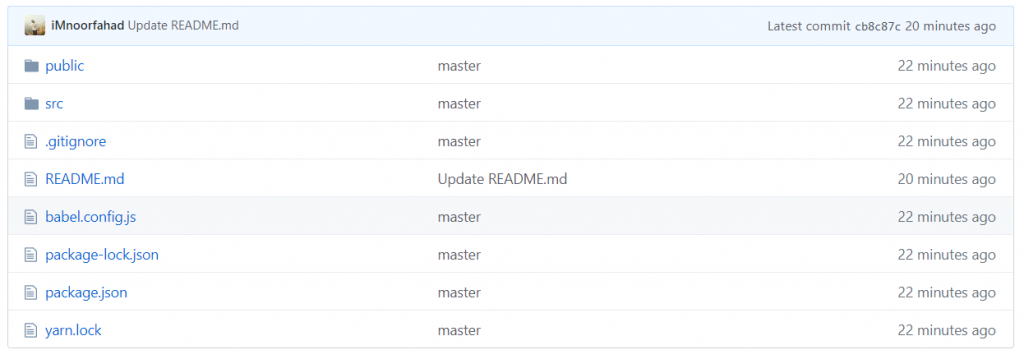
now open src/components folder of your project
and create file with the name of CreateTodo.vue
and write this code.
<template>
  <form class="col-12 col-sm-10 col-md-8 cl-lg-6" @submit.prevent="addTodo()">
    <input
      v-model="newTodo"
      type="text"
      class="form-control"
      placeholder="Create a new to-do..."
    />
  </form>
</template>

<script>
export default {
  data() {
    return {
      newTodo: ""
    };
  },
  methods: {
    addTodo() {
      if (this.newTodo.length > 0) {
        this.$emit("on-new-todo", this.newTodo);
      }
      this.newTodo = "";
    }
  }
};
</script>

<style lang="scss" scoped></style>
Then create new file on same directory with the name of Todo.vue
and write this code
<template>
  <li class="d-flex align-items-center list-group-item">
    <button
      class="btn border-0 flex-grow-1 text-left shadow-none"
      :class="{ completed }"
      @click="$emit('on-toggle')"
      v-if="!isEditing"
    >
      <span>{{ description }}</span>
    </button>
    <form v-else class="flex-grow-1" @submit.prevent="finishEditing()">
      <input
        type="text"
        class="form-control"
        v-model="newTodoDescription"
        @blur="finishEditing()"
        ref="newTodo"
      />
    </form>
    <button
      @click="startEditing()"
      class="btn btn-outline-primary border-0 ml-2"
    >
      <span class="fa fa-edit"></span>
    </button>
    <button @click="$emit('on-delete')" class="btn btn-outline-danger border-0">
      <span class="fa fa-trash"></span>
    </button>
  </li>
</template>

<script>
export default {
  data() {
    return {
      isEditing: false,
      newTodoDescription: ""
    };
  },
  props: {
    description: String,
    completed: Boolean
  },
  methods: {
    startEditing() {
      if (this.isEditing) {
        this.finishEditing();
      } else {
        this.newTodoDescription = this.description;
        this.isEditing = true;
        this.$nextTick(() => this.$refs.newTodo.focus());
      }
    },
    finishEditing() {
      this.isEditing = false;
      this.$emit("on-edit", this.newTodoDescription);
    }
  }
};
</script>

<style lang="scss" scoped>
.completed {
  text-decoration: line-through;
}
</style>
now again crate file on same directory with name of TodoList.vue
and write this code.
<template>
  <div class="container">
    <div class="row">
      <div class="col-12 py-5">
        <h1>{{ listName }}</h1>
      </div>
    </div>
    <div class="row mb-3">
      <create-todo @on-new-todo="addTodo($event)" />
    </div>
    <div class="row">
      <div class="col-12 col-sm-10 col-lg-6">
        <ul class="list-group">
          <todo
            v-for="(todo, index) in todos"
            :key="index"
            :description="todo.description"
            :completed="todo.completed"
            @on-toggle="toggleTodo(todo)"
            @on-delete="deleteTodo(todo)"
            @on-edit="editTodo(todo, $event)"
          />
        </ul>
      </div>
    </div>
  </div>
</template>

<script>
import Todo from "./Todo.vue";
import CreateTodo from "./CreateTodo.vue";

export default {
  props: {
    listName: String,
  },
  data() {
    return {
      todos: [
        { description: "Do the dishes", completed: false },
        { description: "Take out the trash", completed: false },
        { description: "Finish doing laundry", completed: false },
      ],
    };
  },
  methods: {
    addTodo(newTodo) {
      this.todos.push({ description: newTodo, completed: false });
    },
    toggleTodo(todo) {
      todo.completed = !todo.completed;
    },
    deleteTodo(deletedTodo) {
      this.todos = this.todos.filter(todo => todo !== deletedTodo);
    },
    editTodo(todo, newTodoDescription) {
      todo.description = newTodoDescription;
    },
  },
  components: { Todo, CreateTodo },
};
</script>

<style scoped lang="scss"></style>
now Finally open App.vue file on src main directory and import Todo list components
<template>
  <todo-list list-name="My to-dos" />
</template>

<script>
import TodoList from "./components/TodoList.vue";

export default {
  name: "App",
  components: {
    TodoList,
  },
};
</script>

<style lang="scss">
#app {
  font-family: Avenir, Helvetica, Arial, sans-serif;
  -webkit-font-smoothing: antialiased;
  -moz-osx-font-smoothing: grayscale;
  text-align: center;
  color: #2c3e50;
  margin-top: 60px;
}
</style>
now run commend
#to serve project

$ yarn serve
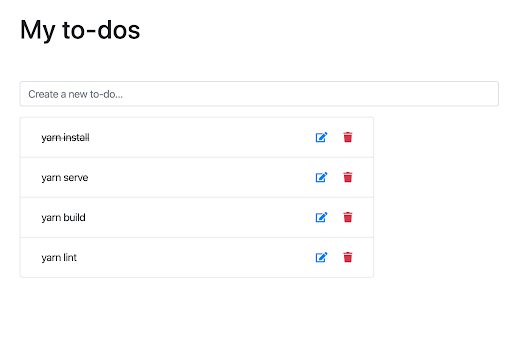
finally look something like this

for full project logon GitHub and download source code link given
If you liked this article, then please subscribe to our YouTube Channel for useful videos. You can also find us on Twitter and Facebook.


Wow, thanks to provide this valuable info 😊